
Warning
You're browsing the old v2.x documentation. This version is no longer maintained. Click here to go the v3.x documentation.
Step 3.2.3: Drawing or erasing a piece
To be able move a piece on the screen, we need a routine that draws it and another one that erases it off of the screen. But since these two operations are very similar, we can code them into a single procedure. I'll explain how.
The following operations are involved in drawing a shape:
- Iterate through all bits in the shape
- Calculate Screen RAM and Color RAM address for each bit that is set
- If the address is in the visible area:
POKEan inverse space to the screen address if we're drawing, a normal space if we're erasingPOKEthe appropriate color code to the color address if we're drawing
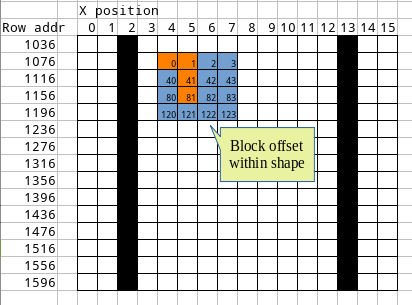
The only task that's relatively difficult is calculating the RAM addresses where we want to POKE. Traditionally we would do this by multiplying the row count with 40 and adding the column count, but as you've seen earlier, multiplication is an expensive operation that we cannot afford. For this reason we will be using lookup tables: we will look up the start address of the row where we want to draw. To get the final address, we'll first add the piece's X position, then add an offset that corresponds the position of the block within the shape:
Here is the function that we will call for drawing or erasing:
REM -- Draw or erase the current shape on screen at the given position
REM -- draw! > 0 means draw, draw! = 0 means erase
PROC draw_shape(shape, x!, y!, color!, draw!)
  REM -- This is the memory address where we can start drawing
  REM -- Everything before is invisible
  CONST VISIBLE_AREA_START = 1199
  REM -- Calculate start addresses
  screen_addr = screen_address[y!] + x!
  REM -- Iterate through all bits in the shape
  FOR bit_pos! = 0 TO 15
    REM -- Calculate where to draw
    addr = screen_addr + block_offset![bit_pos!]
    REM -- Only draw if it's in the visible area
    IF addr >= VISIBLE_AREA_START THEN
      REM -- If bit in shape is set
      IF shape & LSHIFT(CAST(1), bit_pos!) <> 0 THEN
        IF draw! = 0 THEN char! = 32 ELSE char! = 160
        REM -- Draw char
        POKE addr, char!
        REM -- Set color
        REM -- Add the distance between screen RAM and Color RAM
        REM -- To get color address without offsets calculating again
        POKE addr + 54272, color!
      ENDIF
    ENDIF
  NEXT
  REM -- The address in Screen RAM for each row on stage
  DATA screen_address[] = 1036, 1076, 1116, 1156, 1196, 1236, 1276, 1316, 1356, 1396, 1436, 1476, ~
                          1516, 1556, 1596, 1636, 1676, 1716, 1756, 1796, 1836, 1876, 1916, 1956, 1996
  REM -- For each bit in the shape there is a matching offset where the
  REM -- character should be drawn relative to the top left of the shape.
  REM -- This offset, added to the screen address will give us where to
  REM -- plot a character.
  REM -- Note that we're going backwards as Bit #0 is the bottom right position
  DATA block_offset![] = 123, 122, 121, 120, 83, 82, 81, 80, 43, 42, 41, 40, 3, 2, 1, 0
ENDPROC
Did you notice the IF … ENDIF block? It's a convenient alternative to the classic IF … THEN statement if you want to avoid writing a very long line. Read more here.
The other thing above that might be new for you is the CAST() function. It is used to convert a value from one type to another. This is called explicit type conversion. But why do we have to cast the number 1? The answer lies in the way XC=BASIC works when it compiles a numeric literal. If the literal is between 0 and 255, it will treat it as a byte. Now, LSHIFT (without the !) expects an integer as its first argument, so we need to cast the number to an integer first.
There are more operations above that work on different types, take this line for example:
addr = screen_addr + block_offset![bit_pos!]
Because screen_addr is an integer and block_offset! is a byte, the compiler will auto-cast the smaller type (byte) to the larger one (integer). This is called implicit type conversion.
Well done, we can now draw a piece on screen! We can reuse the same routine to draw the preview window, that is, the next piece:
REM -- Draw the piece preview
REM -- Effectively uses the draw_shape routine above
PROC draw_preview
  REM -- Clear the preview area
  FOR i! = 0 TO 4 : TEXTAT 33, 19 + i!, "    " : NEXT
  REM -- Draw the shape in the appropriate color
  CALL draw_shape(\nxt_shape, 21, 19, \colors![\nxt_shape_no!], 1)
ENDPROC
Fantastic! There are only a few routines left. Follow me to the next page where we'll code what happens when a piece is locked.